安装并引入 antd
这个 Demo 准备做一个迷你后台管理系统,实现系统的登录、token 验证、路由拦截、表格数据的增删改查功能。
前端 UI 框架选用ant-design-vue,安装:
yarn add ant-design-vue
一般开发项目的时候,我们不会把整个框架都引入到项目里,而是采用按需加载都方式,需要安装babel-plugin-import插件:
yarn add babel-plugin-import --dev
修改.babelrc文件,配置 babel-plugin-import:
//.babelrc

{
  "presets": [
    ["env", {
      "modules": false,
      "targets": {
        "browsers": ["> 1%", "last 2 versions", "not ie <= 8"]
      }
    }],
    "stage-2"
  ],
  "plugins": [
     "transform-vue-jsx",
     "transform-runtime",
     ["import", { "libraryName": "ant-design-vue", "libraryDirectory": "es", "style": "css" }]
   ]
}
详细修改过程可参考vue-antd-ui 官网
我们把需要用到的 UI 组件一次性导入,打开main.js,改成如下内容:
//main.js

// The Vue build version to load with the `import` command
// (runtime-only or standalone) has been set in webpack.base.conf with an alias.
import Vue from 'vue'
import App from './App'
import router from './router'
import {
  Button,
  Row,
  Col,
  Form,
  Input,
  Card,
  Select,
  DatePicker,
  Table,
  message,
  Pagination,
  Modal,
  Radio
} from 'ant-design-vue'

Vue.component(Button.name, Button)
Vue.component(Row.name, Row)
Vue.component(Col.name, Col)
Vue.component(Input.name, Input)
Vue.component(Card.name, Card)
Vue.component(Select.name, Select)
Vue.component(DatePicker.name, DatePicker)
Vue.component(Form.name, Form)
Vue.component(Table.name, Table)
Vue.component(Pagination.name, Pagination)
Vue.component(Modal.name, Modal)
Vue.component(Radio.name, Radio)
const FormItem = Form.Item
const Option = Select.Option
const RangePicker = DatePicker.RangePicker
const RadioGroup = Radio.Group
Vue.component(FormItem.name, FormItem)
Vue.component(Option.name, Option)
Vue.component(RangePicker.name, RangePicker)
Vue.component(RadioGroup.name, RadioGroup)
Vue.config.productionTip = false

/* eslint-disable no-new */
new Vue({
  el: '#app',
  router,
  components: { App },
  template: '<App/>'
})
提示
全局引入antd框架的时候,发现有个问题,比如Form这个组件,在某个组件引用的时候,还必须再单独引入一次,不然会提示Form undefined,如果大家碰到这个问题,就再单独引入一次;另外如果知道产生原因和解决办法的麻烦在下面留言跟我说下,谢谢了。
登录界面
在components里面新建一个Login.vue的组件,组件内容如下:
//Login.vue

<template>
  <div>
    <a-row>
      <a-col :span="8"></a-col>
      <a-col :span="8">
        <a-card title="欢迎登录">
          <a-form
            @submit="handleSubmit"
            :autoFormCreate="
              form => {
                this.form = form
              }
            "
          >
            <a-form-item
              label="username"
              :labelCol="{ span: 4 }"
              :wrapperCol="{ span: 20 }"
              fieldDecoratorId="username"
              :fieldDecoratorOptions="{
                rules: [
                  { required: true, message: 'Please input your username!' }
                ]
              }"
            >
              <a-input />
            </a-form-item>
            <a-form-item
              label="password"
              :labelCol="{ span: 4 }"
              :wrapperCol="{ span: 20 }"
              fieldDecoratorId="password"
              :fieldDecoratorOptions="{
                rules: [
                  { required: true, message: 'Please input your password!' }
                ]
              }"
            >
              <a-input />
            </a-form-item>
            <a-form-item :wrapperCol="{ span: 16, offset: 4 }">
              <a-button type="primary" htmlType="submit">Submit</a-button>
            </a-form-item>
          </a-form>
        </a-card>
      </a-col>
      <a-col :span="8"></a-col>
    </a-row>
  </div>
</template>

<script>
export default {
  name: 'Login',
  data() {
    return {
      formLayout: 'horizontal'
    }
  },
  methods: {
    handleSubmit(e) {
      e.preventDefault()
      this.form.validateFields((err, values) => {
        if (!err) {
          console.log('Received values of form: ', values)
        }
      })
    }
  }
}
</script>

<style></style>
保存,修改router文件里的index.js文件,把Login组件添加到前端路由里面:
//index.js

import Vue from 'vue'
import Router from 'vue-router'
import HelloWorld from '@/components/HelloWorld'
import Login from '@/components/Login'

Vue.use(Router)

export default new Router({
  routes: [
    {
      path: '/',
      name: 'HelloWorld',
      component: HelloWorld
    },
    {
      path: '/login',
      name: 'Login',
      component: Login
    }
  ]
})
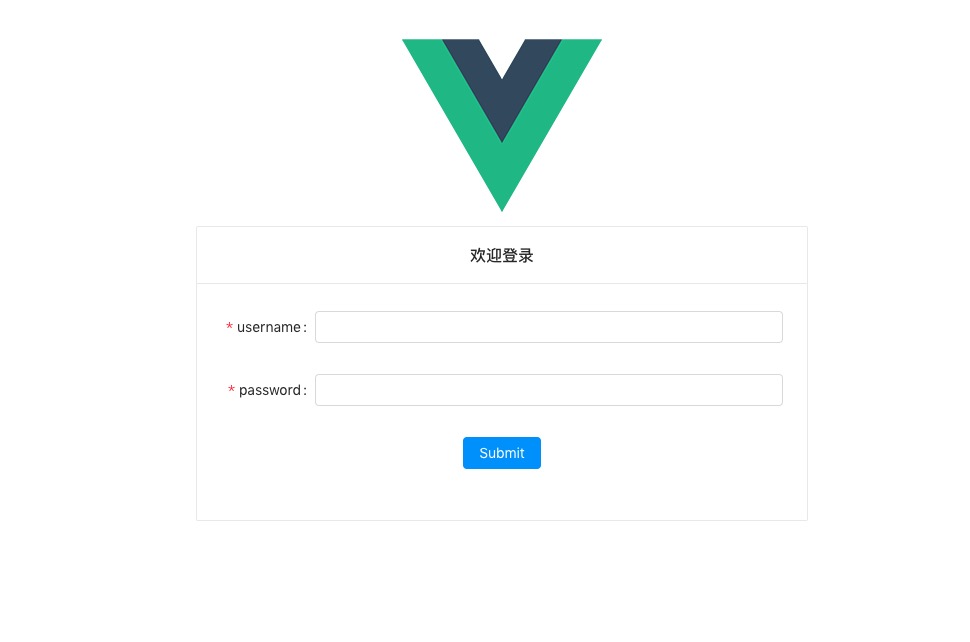
保存,运行yarn dev或者npm run dev启动前端服务,在浏览器网址里输入http://localhost:8080/#/login就能看到如下界面:
后台管理界面
接下来我们创建登录成功后跳转的后台管理界面,因为只是做一个 Demo,所以打算做一个简单的界面,包含数据的增删改查即可。因为在后面我们将涉及到时间的查询,到时候需要对时间格式的数据进行转换,所以要先安装一下moment,
yarn add moment
安装完后在components下新建UserForm.vue,内容如下
//UserForm.vue

<script>
import { Form, Select, Radio } from 'ant-design-vue'
import moment from 'moment'
const FormItem = Form.Item
const Option = Select.Option
const RadioGroup = Radio.Group
const CollectionCreateForm = Form.create()({
  components: {
    'a-form': Form,
    'a-form-item': FormItem,
    'a-select': Select,
    'a-option': Option,
    'a-radio': Radio,
    'a-radio-group': RadioGroup
  },

  props: ['visible', 'selectData', 'title', 'userInfo'],
  render() {
    const { visible, form, title } = this
    const { getFieldDecorator } = form
    const userInfo = this.userInfo || {
      state: '咸鱼一条',
      sex: '男',
      birthday: '2000-01-01',
      interest: '篮球'
    }
    const formItemLayout = {
      labelCol: {
        xs: { span: 8 },
        sm: { span: 4 }
      },
      wrapperCol: {
        xs: { span: 16 },
        sm: { span: 20 }
      }
    }
    const rowObject = {
      minRows: 4,
      maxRows: 6
    }
    return (
      <a-modal
        visible={visible}
        title={title}
        okText="Create"
        onCancel={() => {
          this.$emit('cancel')
        }}
        onOk={() => {
          this.$emit('create')
        }}
      >
        <a-form layout="vertical">
          <a-form-item {...{ props: formItemLayout }} label="用户名:">
            {title === '用户详情'
              ? userInfo.username
              : getFieldDecorator('username', {
                  initialValue: userInfo.username,
                  rules: [
                    {
                      type: 'string',
                      message: '该用户名有效'
                    },
                    {
                      required: true,
                      message: '用户名不能为空'
                    }
                  ]
                })(<a-input placeholder="请输入用户名" />)}
          </a-form-item>
          <a-form-item {...{ props: formItemLayout }} label="性别:">
            {title === '用户详情' ? (
              <p> {userInfo.sex}</p>
            ) : (
              getFieldDecorator('sex', {
                initialValue: userInfo.sex
              })(
                <a-radio-group>
                  <a-radio value="男">男</a-radio>
                  <a-radio value="女">女</a-radio>
                </a-radio-group>
              )
            )}
          </a-form-item>
          <a-form-item {...{ props: formItemLayout }} label="状态">
            {title === '用户详情'
              ? userInfo.state
              : getFieldDecorator('state', {
                  initialValue: userInfo.state
                })(
                  <a-select>
                    <a-option value="咸鱼一条">咸鱼一条</a-option>
                    <a-option value="风华浪子">风华浪子</a-option>
                    <a-option value="北大才子一枚">北大才子一枚</a-option>
                    <a-option value="百度FE">百度FE</a-option>
                    <a-option value="创业者">创业者</a-option>
                  </a-select>
                )}
          </a-form-item>
          <a-form-item {...{ props: formItemLayout }} label="生日:">
            {title === '用户详情'
              ? moment(userInfo.birthday).format('YYYY-MM-DD')
              : getFieldDecorator('birthday', {
                  initialValue: moment(userInfo.birthday)
                })(<a-date-picker showTime format="YYYY-MM-DD" />)}
          </a-form-item>
          <a-form-item {...{ props: formItemLayout }} label="爱好">
            {title === '用户详情'
              ? userInfo.interest
              : getFieldDecorator('interest', {
                  initialValue: userInfo.interest
                })(<a-text-area autosize={rowObject} />)}
          </a-form-item>
        </a-form>
      </a-modal>
    )
  }
})

export default {
  name: 'userForm',
  props: ['visible', 'userInfo', 'title'],
  methods: {
    handleCancel() {
      const form = this.formRef.form
      this.$emit('hideForm', 'noUpdate')
      form.resetFields()
    },
    handleCreate() {
      const form = this.formRef.form
      form.resetFields()
      this.$emit('hideForm', 'update')
    },
    saveFormRef(formRef) {
      this.formRef = formRef
    }
  },

  render() {
    return (
      <div>
        <CollectionCreateForm
          wrappedComponentRef={this.saveFormRef}
          visible={this.visible}
          userInfo={this.userInfo}
          title={this.title}
          onCancel={this.handleCancel}
          onCreate={this.handleCreate}
        />
      </div>
    )
  }
}
</script>
接着在components下新建SearchForm.vue,内容如下
//SearchForm.vue

<script>
import { Form, Select } from 'ant-design-vue'
import moment from 'moment'
import 'moment/locale/zh-cn'
moment.locale('zh-cn')
const FormItem = Form.Item
const Option = Select.Option
const SearchForm = {
  name: 'SearchForm',
  components: {
    'a-form': Form,
    'a-form-item': FormItem,
    'a-select': Select,
    'a-option': Option
  },
  data() {
    return {}
  },

  methods: {
    handleSubmit(e) {
      e.preventDefault()
      this.form.validateFields((err, values) => {
        if (!err) {
          console.log('Received values of form: ', values)
        }
      })
    },
    handleReset() {
      this.form.resetFields()
    }
  },

  render() {
    const { getFieldDecorator } = this.form
    return (
      <a-card>
        <a-form
          id="components-form-demo-normal-register"
          style="float:left;"
          layout="inline"
          onSubmit={this.handleSubmit}
        >
          <a-form-item label="生日:">
            {getFieldDecorator('birthday', {})(<a-range-picker />)}
          </a-form-item>
          <a-form-item label="状态:">
            {getFieldDecorator('state', {
              initialValue: '全部'
            })(
              <a-select style="width:100px;">
                <a-option value="全部">全部</a-option>
                <a-option value="咸鱼一条">咸鱼一条</a-option>
                <a-option value="风华浪子">风华浪子</a-option>
                <a-option value="北大才子一枚">北大才子一枚</a-option>
                <a-option value="百度FE">百度FE</a-option>
                <a-option value="创业者">创业者</a-option>
              </a-select>
            )}
          </a-form-item>
          <a-form-item label="性别:">
            {getFieldDecorator('sex', {
              initialValue: '全部'
            })(
              <a-select style="width:100px;">
                <a-option value="全部">全部</a-option>
                <a-option value="男">男</a-option>
                <a-option value="女">女</a-option>
              </a-select>
            )}
          </a-form-item>
          <a-form-item>
            <a-button type="primary" htmlType="submit" style="margin:0 20px">
              查询
            </a-button>
            <a-button onClick={this.handleReset}>重置</a-button>
          </a-form-item>
        </a-form>
      </a-card>
    )
  }
}

export default Form.create()(SearchForm)
</script>
<style></style>
接着在components下新建UserTable.vue,内容如下:
//UserTable.vue

<template>
  <div>
    <a-card>
      <a-table
        bordered
        :columns="columns"
        :dataSource="dataSource"
        :rowSelection="rowSelection"
        :pagination="false"
      />
      <template>
        <a-pagination
          showQuickJumper
          :defaultCurrent="params.page"
          :total="total"
          @change="onChangePage"
          style="float:right;margin:10px -9px 0 0;"
        />
      </template>
    </a-card>
  </div>
</template>
<script>
import dataSource from './data'
export default {
  name: 'Table',
  props: ['requestList', 'updataData', 'searchParams'],
  data() {
    return {
      dataSource: [],
      selectedRows: [],
      selectedRowKeys: [],
      pagination: {},
      columns: dataSource.columns,
      total: null,
      params: {
        page: 1,
        pageSize: 10
      },
      requestListFlag: this.requestList
    }
  },
  watch: {
    requestList() {
      this.request()
    },
    updataData() {
      this.$emit('receiveTable', this.updataData)
    },
    searchParams() {
      let _this = this
      this.$http.post('/api/searchOperator', this.searchParams).then(res => {
        res.data.result.map((item, index) => {
          item.key = index
        })
        _this.dataSource = res.data.result
      })
    }
  },
  computed: {
    rowSelection() {
      let _this = this
      return {
        type: 'radio',
        onChange: (selectedRowKeys, selectedRows) => {
          _this.selectedRowKeys = selectedRowKeys
          _this.selectedRows = selectedRows
          console.log(
            `selectedRowKeys: ${selectedRowKeys}`,
            'selectedRows: ',
            selectedRows
          )
        },
        onSelect: (record, selected, selectedRows, nativeEvent) => {
          this.$emit('receiveTable', record)
        }
      }
    }
  },
  methods: {
    // 动态获取数据
    request() {},
    onChangePage(pageNumber) {
      this.params.page = pageNumber
      this.request()
    }
  },
  mounted() {
    this.request()
  }
}
</script>

<style scoped></style>
最后修改HelloWord.vue文件,把刚才新建的三个组件添加进去,内容如下所示:
//HelloWord.vue

<template>
  <div>
    <search-form></search-form>
    <a-card style="margin-top:-1px;margin-bottom: -1px;">
      <a-button
        type="primary"
        icon="plus"
        @click="handleOperator('create')"
        class="button"
        >创建员工</a-button
      >
      <a-button icon="edit" @click="handleOperator('edit')" class="button"
        >编辑员工</a-button
      >
      <a-button @click="handleOperator('detail')" class="button"
        >员工详情</a-button
      >
      <a-button
        type="danger"
        icon="delete"
        @click="handleOperator('delete')"
        class="button"
        >删除员工</a-button
      >
    </a-card>
    <user-table
      v-if="hackReset"
      v-on:receiveTable="receiveTable"
      :requestList="requestList"
      :updataData="updataData"
      :searchParams="searchParams"
    ></user-table>
    <user-form
      :visible="visible"
      :userInfo="userInfo"
      :requestList="requestList"
      :title="title"
      v-on:hideForm="hideForm"
    >
    </user-form>
  </div>
</template>

<script>
import UserTable from './UserTable'
import UserForm from './UserForm'
import SearchForm from './SearchForm'

export default {
  name: 'User',
  components: {
    UserTable,
    UserForm,
    SearchForm
  },
  data() {
    return {
      visible: false,
      userInfo: {},
      selectItem: {},
      title: '',
      requestList: false,
      hackReset: true
    }
  },
  methods: {
    // 操作员工
    handleOperator(type) {
      let self = this.$http
      let _this = this
      let deleteId
      if (type === 'create') {
        this.title = '创建员工'
        this.visible = true
        // 因为共用一个Form表单,当用户新建员工时,即使选中了table里面的某一行数据,打开的From表单应该只有默认值,所以这里要清空userInfo;通过selectItem来判断用户有没有选中table的数据
        this.userInfo = null
      } else if (type === 'edit' || type === 'detail') {
        if (!this.selectItem.id) {
          Modal.info({
            title: '信息',
            content: '请选择一个用户'
          })
          return
        }
        this.title = type === 'edit' ? '编辑用户' : '用户详情'
        this.visible = true
        deleteId = this.selectItem.id
      } else if (type === 'delete') {
        if (!this.selectItem.id) {
          Modal.info({
            title: '信息',
            content: '请选择一个用户'
          })
          return
        }
        Modal.confirm({
          content: '确定要删除此用户吗?',
          onOk: async () => {
            let options = {
              url: '/api/deletePersonnelTable',
              method: 'post'
            }
            let params = {
              id: deleteId
            }
            const result = await axios.getData(self, options, params)
            if (result === '删除成功') {
              // 通知UserTable更新数据
              _this.requestList = !_this.requestList
            }
          }
        })
      }
    },
    hideForm(data, params) {
      this.visible = false
      //更新完数据,通知UserTable更新数据
      if (data === 'update' && params !== undefined) {
        this.requestList = !this.requestList
        this.updataData = params
        return
      }
      if (data === 'update' && params == undefined) {
        // 创建完数据,通知UserTable更新数据
        this.requestList = !this.requestList
      }
    },
    receiveTable(data) {
      console.log(11)
      this.userInfo = data
      this.selectItem = data
    }
  }
}
</script>

<style scoped>
.button {
  float: left;
  margin-right: 10px;
}
</style>
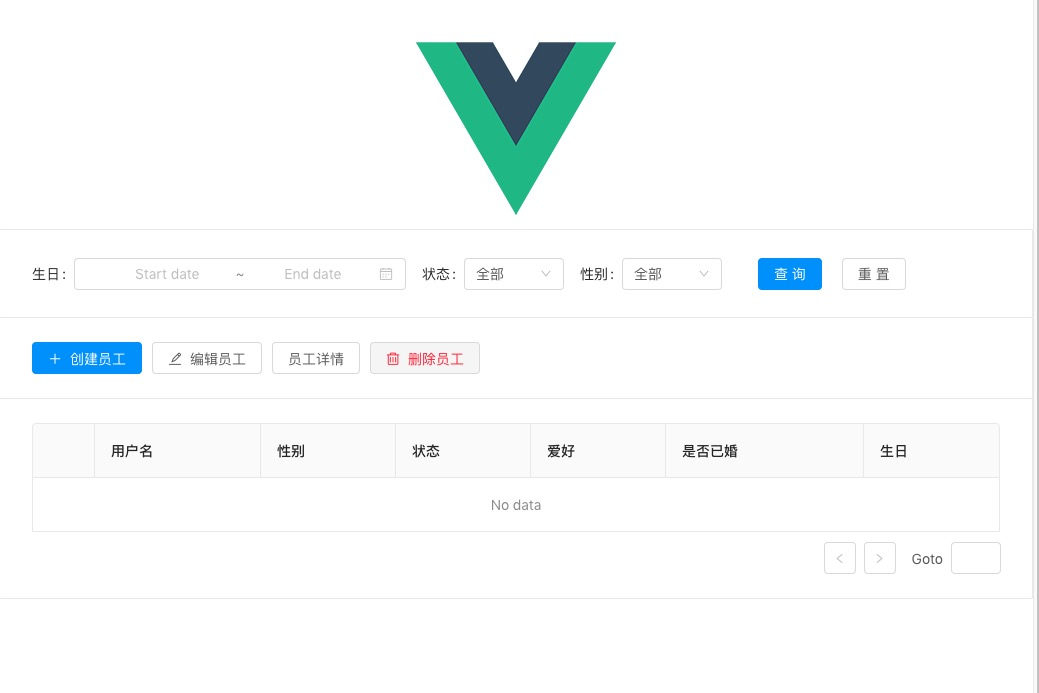
全部修改完后,重新运行yarn dev,在浏览器地址输入http://localhost:8080/#/,就会看到以下画面: